Tuesday, October 15, 2024

What Is XrmToolBox, How To Download And To Login Into XrmToolBox

See the below screenshot as per XrmToolBox is having definition.

1. To download XrmToolBox open the below link.
    https://www.xrmtoolbox.com/

2. Click on Download Latest Version.

3. It will download the Zip file. Extract the Zip file and open the XrmToolBox app.

4. Once it's open click on Not Connected from the left side of this window and click on Create New Connection 


5. Now give your environment URL and entered the User Name and Password.


6. Click on Next and give your connection name like Dev, UAT and Production environment connection.

7. Now your connection is ready to use. Please connect to your connection and go to open Tool Library  to install required tools into your XrmToolBox, like Plugin Registration Tool, Data Transporter, FetchXmlQuery Builder etc.

8. Here I want to install Plugin Registration Tool, so I search for it and clicked on install button. See the below screenshot.


Friday, October 11, 2024

How To Register The Plugin Step

The plugin steps needs to be created after plugin registration is successful. Open your Plugin Registration Tool OR open you Plugin Registration Tool from XrmToolBox.

Follow below steps to register the Plugin steps.

1. Go to your registered Plugin DLL => Select your Plugin class => Right click on it => Select the Register New Step

2. In the this new window fill the information as below.

A. Message: Messages are mentioned the event of your plugin like Create, Update, Delete, Associate etc.
B. Primary Entity: Primary Entity mentioned on which entity/table your plugin code will be execute.
C. Event: Here Eventing Pipeline Stage of Execution are mentioned at where your plugin code will be execute like Pre-Validation, Pre-Operation and Post-Operation. 


How To Register Dynamics 365 CRM Plugin

 1. Open Plugin Registration Tool and Signing into it. Here I am opening it from XrmToolBox.

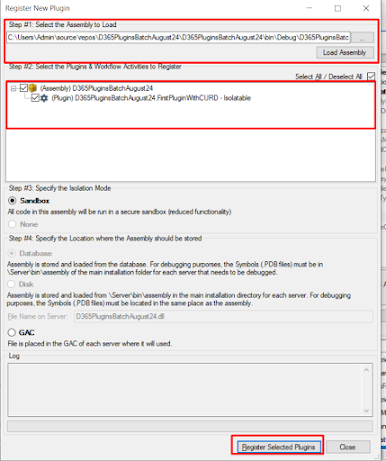
2. Click on Register and select the option of Register New Assembly

3. Once you click on it below window will be open. Here you have to select your Plugin DLL. Click on 3dot as below window screenshot.

4. Select your Plugin DLL from your project folder => Bin => Debug => Select your DLL file => now click on Open button.

5. Now here you have select your Plugin classes to register and click on Register Selected Plugin


Create Dynamics 365 CRM/CE Plugin Step By Steps

 Follow below steps to create Dynamics 365 CRM Plugin.

1. Open your Visual Studio, here I am using 2019, Once you open you will see right side option as Continue without code, click on it.

2. Click on File tab New => Project.

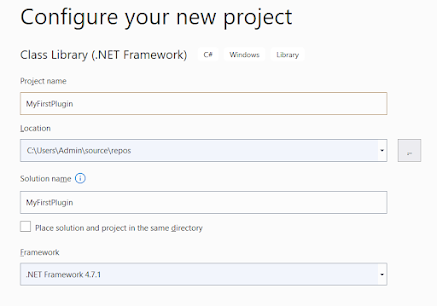
3. In the search window Class Library and select the Class Library (.NET Framework), see the screenshot below and click on NEXT.
4. Now give your Project name and other details as below. and click on Create.
5. Now Visual Studio is open go to Solution Explorer. Here you will see all your Plugin project components. Right click on References => Add Reference => Browse => Go to Your Plugin Registration Tool folder and select the following DLL.
A. Microsoft.Xrm.Sdk.dll
B. Microsoft.Xrm.Sdk.Proxy.dll
C. Microsoft.Xrm.Tooling.Connector.dll

6. Inherit the IPlugin interface to your Plugin class. Once you add it's using Microsoft.Xrm.Sdk.dll reference, add those reference and implement interface. Over the mouse cursor on IPlugin then you will see it.


7. Now add the below common of the plugin as below inside the Execute method.

// Obtain the execution context from the service provider.  
            IPluginExecutionContext context = (IPluginExecutionContext)serviceProvider.GetService(typeof(IPluginExecutionContext));

            // Obtain the IOrganizationService instance which you will need for  
            // web service calls.  
            IOrganizationServiceFactory serviceFactory =
               (IOrganizationServiceFactory)serviceProvider.GetService(typeof(IOrganizationServiceFactory));

            IOrganizationService service = serviceFactory.CreateOrganizationService(context.UserId);

            // Obtain the tracing service
            ITracingService tracingService = (ITracingService)serviceProvider.GetService(typeof(ITracingService));

            // The InputParameters collection contains all the data passed in the message request.  
            if (context.InputParameters.Contains("Target") && context.InputParameters["Target"] is Entity)
            {
                // Obtain the target entity from the input parameters.  
                Entity accountEntity = (Entity)context.InputParameters["Target"];

            }


8. Sign the assembly. Right click on your project into Solution Explorer => click on Properties
9. Go to left side Signing tab. Check the checkbox Sign the assembly  

10. click on New.

11. Give you signing name (name my anything as per your logic).

NOTE: As of now Plugin is supporting dot net framework 4.7.1 version. If you don't have then download it from below URL and install it. Once it's install re-start your system/laptop and set the Framework to 4.7.1


Rebuild your solution.
Now you plugin code is ready. You have add your logic after the line number 32.

How To Download Plugin Registration Tool

 The Plugin Registration Tool are used to register the plugins and register the step of plugins.

Follow below steps to download the plugin registration tool.

1. Create one folder into your system any drive folder name as: Dynamics_365_Plugin_Tools

2. Open Windows PowerShell from your Windows Start Menu


3. My folder name is Dynamics_365_Plugin_Tools and it's into C drive. Default Windows PowerShell set to C drive. put the below line.
                                       

4. Once Directive change then add/past the below code and press enter.
                                      

[Net.ServicePointManager]::SecurityProtocol = [Net.SecurityProtocolType]::Tls12
$sourceNugetExe = "https://dist.nuget.org/win-x86-commandline/latest/nuget.exe"
$targetNugetExe = ".\nuget.exe"
Remove-Item .\Tools -Force -Recurse -ErrorAction Ignore
Invoke-WebRequest $sourceNugetExe -OutFile $targetNugetExe
Set-Alias nuget $targetNugetExe -Scope Global -Verbose
##
##Download Plugin Registration Tool
##
./nuget install Microsoft.CrmSdk.XrmTooling.PluginRegistrationTool -O .\Tools
md .\Tools\PluginRegistration
$prtFolder = Get-ChildItem ./Tools | Where-Object {$_.Name -match 'Microsoft.CrmSdk.XrmTooling.PluginRegistrationTool.'}
move .\Tools\$prtFolder\tools\*.* .\Tools\PluginRegistration
Remove-Item .\Tools\$prtFolder -Force -Recurse

5. Once you press enter you will see the download starting window as below.


6. Once it's completed go to you folder you will see the one folder with name Tools  open it and you will one more folder with name PluginRegistration open it now you will all your Plugin Registration Tool .dll files and Plugin Registration Tool option.


What Is Plugin Into Dynamics 365 CRM

 In this post we are going to explain what is Plugin into Dynamics 365 CRM/CE.

Plugins are the custom code/logic which is created by using C# Programming language. These plugin (custom code/logic) are used to extend the functionality of Dynamics 365 CRM/CE.

There are lot of scenarios and requirements which is not achieved by using with OOB (Out Of the Box) functionality. So you have to go to with Plugins.

Plugins execution are fast and it's provide the lot of events, messages, actions etc. to perform your operations.

Following are some points which is required to you have good knowledge for working on the Plugins.

1. Knowledge of Dot Net Framework.|
2. C# Programming Language.
3. OOPS concept.
4. Dynamics 365 CRM/CE good functional knowledge.


In our next post we will explain the How to create the plugin.

Saturday, October 5, 2024

Java Script Into Dynamics 365 CRM/CE

 In this post we are going to explaining what is Java Script and it's uses into Dynamics 365 CRM.

What Is Dynamics 365 CRM/CE Plugin?

 In this post we are explaining about the Dynamics 365 CRM/CE Plugins.

Step By Step Explain Dynamics 365 CRM Sales Module

 Here we are explaining the Dynamics 365 CRM Sales Module step by step.

What Is Dynamics 365 CRM/CE?

 In this our first post we are explaining here about Dynamics 365 CRM/CE.

1. Dynamics 365 CRM:

Dynamics 365 CRM (Customer Relationship Management) is the Microsoft product which is used to handle the current and future customers. with this Dynamics 365 CRM product, Microsoft provide the 3 modules like Marketing, Sales and Service.

All these modules are build by using Model Driven Application.


2. Dynamics 365 CE:

Dynamics 365 CE (Customer Engagement) s the Microsoft product which is used to handle the current and future customers. with this Dynamics 365 CRM product, Microsoft provide the different modules like Marketing, Sales, Service, Field Service and Project Service.

All these modules are build by using Model Driven Application.

What Is A Column In Dynamics 365 CRM?

 In This Post we are going to Explain