Follow below steps to create Dynamics 365 CRM Plugin.
1. Open your Visual Studio, here I am using 2019, Once you open you will see right side option as Continue without code, click on it.
2. Click on File tab New => Project.3. In the search window Class Library and select the Class Library (.NET Framework), see the screenshot below and click on NEXT.
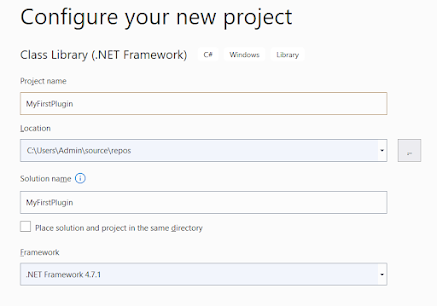
4. Now give your Project name and other details as below. and click on Create.
5. Now Visual Studio is open go to Solution Explorer. Here you will see all your Plugin project components. Right click on References => Add Reference => Browse => Go to Your Plugin Registration Tool folder and select the following DLL.A. Microsoft.Xrm.Sdk.dll
B. Microsoft.Xrm.Sdk.Proxy.dll
C. Microsoft.Xrm.Tooling.Connector.dll
6. Inherit the IPlugin interface to your Plugin class. Once you add it's using Microsoft.Xrm.Sdk.dll reference, add those reference and implement interface. Over the mouse cursor on IPlugin then you will see it.
7. Now add the below common of the plugin as below inside the Execute method.
// Obtain the execution context from the service provider.
IPluginExecutionContext context = (IPluginExecutionContext)serviceProvider.GetService(typeof(IPluginExecutionContext));
// Obtain the IOrganizationService instance which you will need for
// web service calls.
IOrganizationServiceFactory serviceFactory =
(IOrganizationServiceFactory)serviceProvider.GetService(typeof(IOrganizationServiceFactory));
IOrganizationService service = serviceFactory.CreateOrganizationService(context.UserId);
// Obtain the tracing service
ITracingService tracingService = (ITracingService)serviceProvider.GetService(typeof(ITracingService));
// The InputParameters collection contains all the data passed in the message request.
if (context.InputParameters.Contains("Target") && context.InputParameters["Target"] is Entity)
{
// Obtain the target entity from the input parameters.
Entity accountEntity = (Entity)context.InputParameters["Target"];
}
8. Sign the assembly. Right click on your project into Solution Explorer => click on Properties
9. Go to left side Signing tab. Check the checkbox Sign the assembly 10. click on New.
11. Give you signing name (name my anything as per your logic).
NOTE: As of now Plugin is supporting dot net framework 4.7.1 version. If you don't have then download it from below URL and install it. Once it's install re-start your system/laptop and set the Framework to 4.7.1
Rebuild your solution.
Now you plugin code is ready. You have add your logic after the line number 32.


No comments:
Post a Comment